Alex Chalkias
on 30 March 2021
Kubernetes orchestrates clusters of machines to run container-based workloads. Building on the success of the container-based development model, it provides the tools to operate containers reliably at scale. The container-based development methodology is popular outside just the realm of open source and Linux though. Exactly the same benefits of containers – low resource overhead, dependency management, faster development cycles, portability and consistent operation – apply to applications targeting the Windows OS also. In this article, we will present the steps to deploy Windows workloads on Kubernetes, with MicroK8s Windows workers.
Kubernetes on Windows
There are no plans to develop code for a Windows only Kubernetes cluster. The control plane and master components (kube-apiserver, kube-scheduler, kube-controller) will, for the foreseeable future, only run on a Linux OS. However, it is possible to run the services required for a Kubernetes node on Windows.
This means that a worker node can be used to run Windows workloads, while the control plane runs on Linux – a hybrid cluster. Production-level support for running a Windows node was introduced with version 1.14 of Kubernetes back in March 2019, so in terms of deployment of Windows containers, operators can expect exactly the same features for Windows workloads as they do for Linux ones.
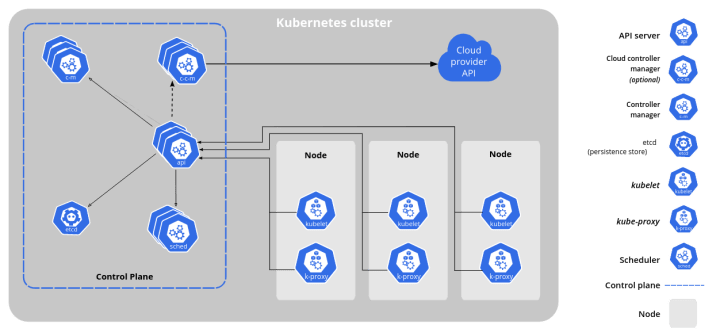
The Kubernetes components that are required for a worker node are:
- kubelet: this is the Kubernetes agent which manages and reports on the running containers in a pod.
- kube-proxy: a network proxy component which maintains the network rules and allows pods to communicate within or externally to the rest of the cluster
- a container runtime: the executable responsible for running individual containers. Actually, several different container runtimes are now supported by Kubernetes – Docker, CRI-O, containerd (and through that, many others such as the Windows-specific runhcs), as well as any other which support the Kubernetes container runtime interface (CRI)

Kubernetes cluster components (image CC BY 4.0 The Kubernetes Authors).
It is of course possible to manually install these components on a Windows machine and construct a node, then integrate it into an existing cluster. There are easier ways to achieve this though.
MicroK8s and Calico
For the Linux-based part of a hybrid Kubernetes cluster, MicroK8s is a compelling choice. MicroK8s is a minimal implementation of Kubernetes which can run on the average laptop, yet has production grade features. It’s great for offline development, prototyping and testing, and if required you can also get professional support for it through Ubuntu Advantage.
The most compelling feature of MicroK8s for this use case is that you can run it sort-of-almost-natively on Windows 10! For development work and even production use-cases, this is hugely useful – your hybrid cluster can reside on one physical Windows machine. MicroK8s on Windows works by making use of Multipass – a neat way of running a virtual Ubuntu machine on Windows. The MicroK8s installer for Windows doesn’t require any knowledge of multi-pass or even virtual machines though, it sets everything up with just a few options from the installer.
To fetch the current installer and see the (simple!) install instructions for MicroK8s on Windows, check out the MicroK8s website.
Whether using MicroK8 on Windows or a separate Linux machine, the next thing to consider is networking. Calico has been the default CNI(Container Network Interface) for MicroK8s since the 1.19 release. The CNI handles a number of networking requirements:
- Container-to-container communications
- Pod-to-Pod communications
- Pod-to-Service communications
- External-to-Service communications
The popularity of Calico has been building for some time over simpler CNIs, as it supports more useful features (e.g. Border Gateway Protocol [#ref]) and is also available in a supported enterprise version.
Usefully, Calico already bundles the Windows executables for this CNI in an installer script that also fetches the other components required for a Windows node, making installation and setup that much easier. The Calico website has complete instructions for this. This contains not only links to the installer script but also a detailed rationale on how the setup works. If you are just interested in getting started with adding a Windows worker with MicroK8s there are more concise and specific instructions in the MicroK8s documentation.
Scheduling Windows containers on hybrid Kubernetes
The final step of this journey is to actually deploy some Windows containers. With a hybrid cluster, you could potentially be running Windows or Linux based containers and Kubernetes will need some way of knowing which nodes to deploy them on.
A pod specification for a Windows workload should contain a nodeselector field identifying that it is to run on Windows. The recommended additional workflow is to use the ‘taints and tolerations’ features of Kubernetes, to explicitly refuse deployments on the Windows nodes to any pod which hasn’t specifically requested them. There is a full explanation of this workflow in the upstream Kubernetes documentation.
More from MicroK8s
There is plenty more you can do with a MicroK8s cluster – be sure to check out the documentation for MicroK8s add-ons so you can enable the dashboard, ingress controllers, Kubeflow and more.


